Showing posts with label Tenns Cans. Show all posts

Monday, September 19, 2016

Tips for Storing Small Appliances

Here's my solution for "finding" more space to 
store all my small appliances. Plus, a great tip
on managing those loose dangly cords. 
I'll share that at the end
The top shelf in a kitchen cabinet is where I
 store all my small appliances: 2 waffle irons, 
regular and heart shaped, a George Forman 
small grill, a crepe pan (the kind you dip
 into the batter), a knife sharpener, and 
a sandwich maker.  I like that I can see 
them all and therefore use them. 
Notice the cord problem. 
I'm going to fix that too. 
The stuff was just stacked up there willy-nilly.
I do not do willy-nilly well, so what I decided 
was needed was another shelf.
As you can see I'm obsessed with turntables. 
I found this one at Walmart and it expands
to fit perfectly. Sofie thought that was a 
genius idea. 
 Everything off the top shelf. 
I keep an IKEA 2-step stool in the kitchen. 
It gets me to any shelf. 
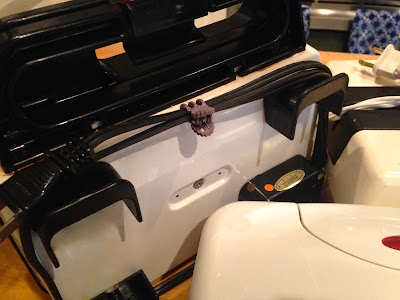
 Now my little BIG tip! Here's my immersion 
hand blender. Notice the cord is out of control.
Also notice the tiny butterfly clips. I get those
whoever I buy orchids and naturally I save 
them. And naturally I keep those saved clips
 in one of my tennis cans. 
Well, they came in handy. 
Viola! Yes, just clip the cord onto
itself. it's fast, easy, and holds
the cord in place.
 I have enough of those little clips for all 
the appliances. 
 Secure the cords.
 When I unwind I just keep the clip on the cord
 so it doesn't get lost. Use and just
clip it together again. So easy! 
 If you have little girls, or little doggies, you 
probably have these clips already. I'm sure 
you can buy a bag at a dollar store or Walmart.
 or steal one off your orchid plant. 
 I put everything back in the cabinet, 
and had no dangling messy cords. 
Now I even have extra room. 
They are so much easier to get out and
the chance of getting bonked on the head
has been greatly reduced. 

Cheers!


Thursday, March 24, 2016

Organize The Car Trunk With A Shelf

Everything you have in your car's trunk will
be so much easier to find with this one
simple addition...a shelf!
My "before and after" trunk.
The back of my car was a mess!
The usual suspects; bags of things to return, 
extra shopping bags, all my "just-in-case" 
stuff. I was rummaging through it all every
time I needed to get something. It was time
to find a better way that worked for me and 
finally get that trunk organized.
First I needed to completely empty all
the stuff out of the trunk.
Here's what went back in...first try.
My car trunk duffel, and a large bag of
stuff to return. I don't go shopping that
often, so they can stay there for way too long. 
In the duffle were my extra shopping bags, a 
first aid kit, a couple of tennis cans; one with
 extra trash bags (for the car and the dog) the
other one stored a plastic picnic tablecloth,
 (for those impromptu car trip lunches), a pair
of old sneakers and flip flops for emergencies,
a beach towel and blanket. Beach
emergencies are common in South Florida.
An extra dog leash and water bowl for our
 Sofie can also come in handy if you ever
 find a stray. 
That arrangement didn't solve my "rummage"
problem. I decided adding a shelf would be a
good solution. I repurposed an old closet shelf
we had stored in the attic and Larry cut it to
 size (46") using a hack saw. It fit nicely
using the wheel ledges as support. If you
 don't have that you can build a support out
 of wood scraps. I used the extra wood
support at the back end.
You can see the end of the shelf resting 
on the inside wheel's ledge. 
It's important that you cover the raw edge 
of the shelf with these rubber end caps so 
they don't scratch the car's interior. 
I had some saved in a jar in the 
utility room. Jars rule!
The top shelf has easy-to-grab shopping
totes, wine bags, insulated bags. Underneath
the shelf are the return bags and duffle. 
The shelf isn't attached so it can be removed
 whenever needed. The lip at the end of the 
shelf keeps things from sliding off. 
Plenty of room for groceries or my
ready-to-go beach bag.
Works for me!

Cheers!

follow me on FACEBOOK
Links: Between Naps On The Porch


Monday, March 21, 2016

Finding Free Tennis Cans to Repurpose

 I use FREE empty tennis cans to organize!
I hit the empty tennis can jackpot!
My tennis club was having a tournament last
weekend and they supplied all these balls.
All the empty cans were stacked to be 
taken to the dumpster.
 Imagine my delight when I walked past this
stack of boxes.
All I need to do is rip off the label
and toss (or re-purpose) the metal tops. 
They are perfect, unbreakable, see-through
organize containers. 
You know, if you've read my blog, that I
obsessed like to repurpose empty tennis cans
for FREE, lightweight, see-through,
storage containers for...everything!
garage, bathroom, crafts, office supplies, 
gym bag, car trunk, toys, ornaments, 
ribbons, gift tags, odds-and-ends, kitchen, 
laundry, game pieces, candles, first-aid kit,
extension cords, night light bulbs, etc......
 Now I already have a good supply in my
  garage already, but I can always use more. 
Right? Give some away. Ambush-organize
someone's stuff, or just replace a few
of my older ones.
Of course my little Sofie girl loves to play
with tennis balls. 
Check out a few of my tennis can 
storage ideas HERE.


Cheers!


Thursday, September 10, 2015

DIY Scarf Hanger

This is a great way to organize
 all your scarves for easy access.
All you need is a hanger, 
pretty wood or bamboo will do.
I used a pack of cheap-o shower curtain
 rings I'd been saving for some reason.
Yes, they were stored in a tennis can
How else would I have found them?
Then in minutes I gathered my small pile of
 scarves and looped them through. 
Easy access!
If you have a lot of scarves you can do
separate hangers for spring/summer
 and fall/winter, or by color group.

Cheers!


Monday, August 24, 2015

Save Those Souvenir T-shirts~Part 1

I have this super-cool tie-died t-shsirt from
Jamaica. It even has Hard Rock Cafe
embroidered on the front. Hard to believe
that I would cut-up this beauty,
but thats's what I did.
Cut out the embroidered front. 
 I used my old tennis balls.
*This craft will cost nothing 
*There's nothing to buy. 
*You only need 3 things,
free balls, old t-shirts, scissors
If you don't play tennis, get some from
 a friend or your local tennis club. 
 Save the empty tennis cans too!
 I have 1,000s of way to use those 
for storage. Let's continue, shall we?
Cut the fabric into strips and just wind
around the ball to cover. The t-shirt fabric
stretches a bit and clings to itself. You can pin
 the end if you want to but it's not necessary
if you're just going to pile them into a bowl.
 Now I have beachy-oceany-looking balls.
Keeps the spirit of our Jamaican vacation.
Think of the possibilities!
Seasons? Holidays? 
HERE are my Patriotic Balls
I can do this while I'm watching TV.
Then just pile them  in a basket or bowl
 and done.

I've also covered them with rope
as seen in this post.
Coming up next-part 2, another project 
using more of the same t-shirt. 

Cheers!