Monday, August 29, 2016

How To Propagate A Red Coleus Plant

I have a red coleus plant that I've propagated
 over and over again. I use them as fillers for
 my larger containers or in the landscaping.
They also make a nice houseplant and
 are low maintenance.  
To keep the plant healthy and full, I pinch
 back the new shoots or just cut them off 
and plant the cuttings elsewhere. 
If the soil is kept moist I can just stick
 them right into the container or garden.
 I've had good luck with that method,
 but if I want to be sure of a good 
plant for a container I'll propagate
 by letting them root in water first. 
Coleus is one of the easiest plants to 
propagate. The process is simple and 
straightforward, making it a good choice 
for your first attempt. The plant produces 
beautiful foliage in a variety of colors. 
All you need is: a healthy coleus plant,
a jar with water, and potting soil. 
Snip a cutting from an established plant 
that has two leaves and about 2 inches of
 stem. Pinch the top terminal new growth.
Partially fill a jar with water. Put the stem
 into the water, but do not let the water 
touch the leaves. Replenish or change the 
water as needed. A healthy root system 
emerges from the cutting in less than a week. 
Plant the cutting in a pot with potting soil, 
or right into your garden in suitable climates. 
Make sure to keep the soil  of the new
coleus evenly moist. 
I usually cut a bouquet of coleus and fill 
a Ball jar. It looks pretty on my table and 
when the roots sprout I can plant it
and start the process over again. 

I've used the method with basil HERE,
 clerodendrum vine and  HERE.

Cheers!


How To Propagate A Red Coleus Plant

I have a red coleus plant that I've propagated
 over and over again. I use them as fillers for
 my larger containers or in the landscaping.
They also make a nice houseplant and
 are low maintenance.  
To keep the plant healthy and full, I pinch
 back the new shoots or just cut them off 
and plant the cuttings elsewhere. 
If the soil is kept moist I can just stick
 them right into the container or garden.
 I've had good luck with that method,
 but if I want to be sure of 
a good plant for a container I'll propagate
 by letting them root in water first. 
Coleus is one of the easiest plants to 
propagate. The process is simple and 
straightforward, making it a good choice 
for your first attempt. The plant produces 
beautiful foliage in a variety of colors. 
All you need is: a healthy coleus plant,
a jar with water, and potting soil. 
Snip a cutting from an established plant 
that has two leaves and about 2 inches of
 stem. Pinch the top terminal new growth.
Partially fill a jar with water. Put the stem
 into the water, but do not let the water 
touch the leaves. Replenish or change the 
water as needed. A healthy root system 
emerges from the cutting in less than a week. 
Plant the cutting in a pot with potting soil, 
or right into your garden in suitable climates. 
Make sure to keep the soil  of the new
coleus evenly moist. 
I usually cut a bouquet of coleus and fill 
a Ball jar. It looks pretty on my table and 
when the roots sprout I can plant it
and start the process over again. 

I've used the method with basil HERE,
 clerodendrum vine and  HERE.

Cheers!


Thursday, August 25, 2016

Organizing A Big Purse

The bottomless pit in a big purse can be a 
challenge. It was time to organize my purse
with a new system to end the clutter. No
more digging around to find what I needed. 
I had the help of my assistant Sofie, 
who wanted to be involved. 
First I dumped out everything in my bag. 
  By sorting everything into categories
I would need 3 small zip pouches.
Designating small bags for items means
 I can find what I'm looking for quickly.
Find these inexpensive bags at Target,
Walmart, Staples, and the Dollar Store.
They are thin and lightweight. You don't
want to add  more bulk and weight. 
 I'm using a clear bag for receipts, coupons, 
a shopping list, and a list of where my errands
take me for the week. I like that I can glance
 at the list without opening the bag.
 No more searching for receipts for items 
that need to be returned.  Contents in
this pouch change weekly with my errands.
This bag holds emergency stuff: small first 
aid kit with bandaids, Advil and aspirin in a 
repurposed contact lens case, a Swiss army 
knife, a bottle holder lanyard, CPR mask, etc.
This bag holds: notepad, pens, paper tape 
measure, foldable reading glasses, a lens 
cleaning cloth, mini flashlight, paint chip 
cards (if I need to match a color for a buy), 
and a printable master shopping list, 
(I keep and edit a master list on my 
computer and print it out when it's updated),
also a small pouch for my earbuds. 
My leather Coach makeup bag can double
as a small clutch if needed when traveling.
My wallet and separate glasses case.
These are my 2 favorites. A Brighton
 case holds both reading and sun glasses.
The Coach one can double as a phone case. 
There you have it!
All sorted and organized.
Sofie is fascinated by the process.
This makes it very quick to change purses. 
Most purses have a zip compartment and
 I always use it to store my wallet safely.
The wallet has a pocket where I can put
my phone if I'm doing a quick run into a store.
This large Coach bag has lots of interior 
pockets and my new system works great for
 tucking the small bags in to fit. My wallet 
is in the middle zippered pocket.
There's a slot for glasses and phone.
This one is even big enough for my iPad. I'll 
bring it if my day may include some wait time. 
I can even throw in a pashmina or light 
sweater for chilly restaurants and movie
theaters. I keep my purse in a designated
 place in the house. I never put it on the
 floor or table when out or at home. 
Occasionally I wipe off the outside, including
 the bottom, and handles with disinfecting
 wipes. You can do this quickly when you walk
 into a grocery store.
 ~tip~
I always grab an insulated cold water bottle 
whenever I head out the door for the car.
Stay hydrated my friends! And organized!

Cheers!

Monday, August 15, 2016

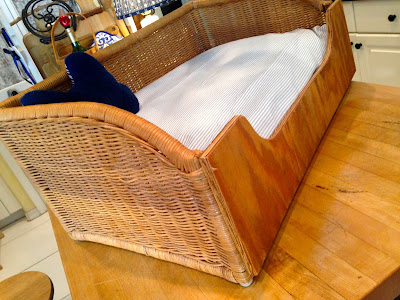
Turn A Broken Basket Into A Dog Bed

Yes, Sofie has another bed basket. 
Unfortunately this large basket got crushed
in the garage.
 Not wanting to rush things and throw it out
like a normal person would, I thought about
how to repurpose it.
 
We needed to replace the front. Before 
we cut out the front I added glue to the
end splints to hold them in place. 
 Used a small saw to cut out the front.

 The ends will be covered with the wood.
 Larry found a scrap piece of plywood and 
cut it to fit and also cut a scoop to create a
easy entry for Sofie. I'm thinking of
stenciling her name on the front, or
"dog blessed"
 This is definitely a rustic/shabby project. 
Meaning I didn't want to fuss with it. 
I just rubbed the front with mineral oil.
 It brought out the wood tones plus it's 
non-toxic. I use it to condition the wood on 
my kitchen island as well as a few projects
Again, it's the easiest and fastest thing to do.
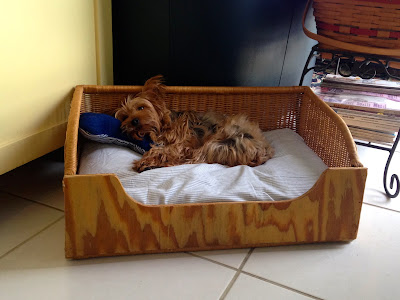
 The best part about this basket is that it is 
the right size for a standard pillow. I have a 
stack of old pillowcases, so I can change her 
bedding weekly, or just flip the pillow over
 for another week .
 This one is a blue and white stripe. 
 I put it in the family room to see
if she would get in on her own.
 She did! Time for a nap.
 Precious!

Cheers!


Thursday, August 11, 2016

Tip: Appliance Cord Storage

This is a great solution to those messy appliance cords.
 Works on your stand mixer, bread maker, 
blender, crock pot, and all the ones on the 
counter or in storage. 
 My stand mixer is on the counter next to 
the fridge at the end of the kitchen.
 The cord is always a messy jumble.
 Here's the simple solution. I had 2 of these 
loop attachments to give this a try.
 Since I had previously used these loops 
some of the sticky had worn off. I used
double sided tape to attach them. 
You won't need to do that.
 Attach to the back and loop on the cord. 
It's easy to hook and unhook when needed. 
No more messy cords on the counter. 
 Much neater area now.
Added one to the bread machine that's 
on the storage shelf in the laundry room. 
Happy that I got to reuse these little 
hooks I'd saved and got to do this little
project in minutes. Now I can get another
set for the rest of cord-challenged items. 

Cheers!

tip: These Command cord bundler hooks can be found at

Home Depot, Walmart, and Target.

Follow me on Facebook!

Links: Between Naps On The Porch

SaveSave
SaveSave